Working with Scenarios
Build, test, and publish workflows that keep your orders and inventory in sync.
Scenarios are the heart of SyncMyOrders. Each one defines how data moves between your sales channels, warehouse tools, and support systems. Use them to normalize inputs, branch on business rules, and push updates back to every destination.
What you can do
- Normalize orders from every channel into a single format before fulfillment.
- Fan out shipments by warehouse or carrier based on your rules.
- Trigger downstream updates (support tickets, customer notifications, finance exports) from the same flow.
- Reuse common routines like address validation or file imports across scenarios.
Basic build workflow
- Create a scenario: Start from a blank canvas or a template that matches your integration pattern.
- Lay out steps: Combine agent steps, conditionals, splits, and switches to express your business logic.
- Map inputs/outputs: Define what the scenario expects, shape the data between steps, and set the return payload.
- Test and publish: Run with sample data, inspect results, then mark the latest version as active for production use.
Tips for stable scenarios
- Keep entry points narrow: validate required fields early and fail fast on bad payloads.
- Use variables to avoid recalculating values across steps.
- Centralize shared routines (like tax or currency conversions) in separate scenarios and call them with
StartScenario. - Version often so you can roll back quickly if a change behaves unexpectedly.
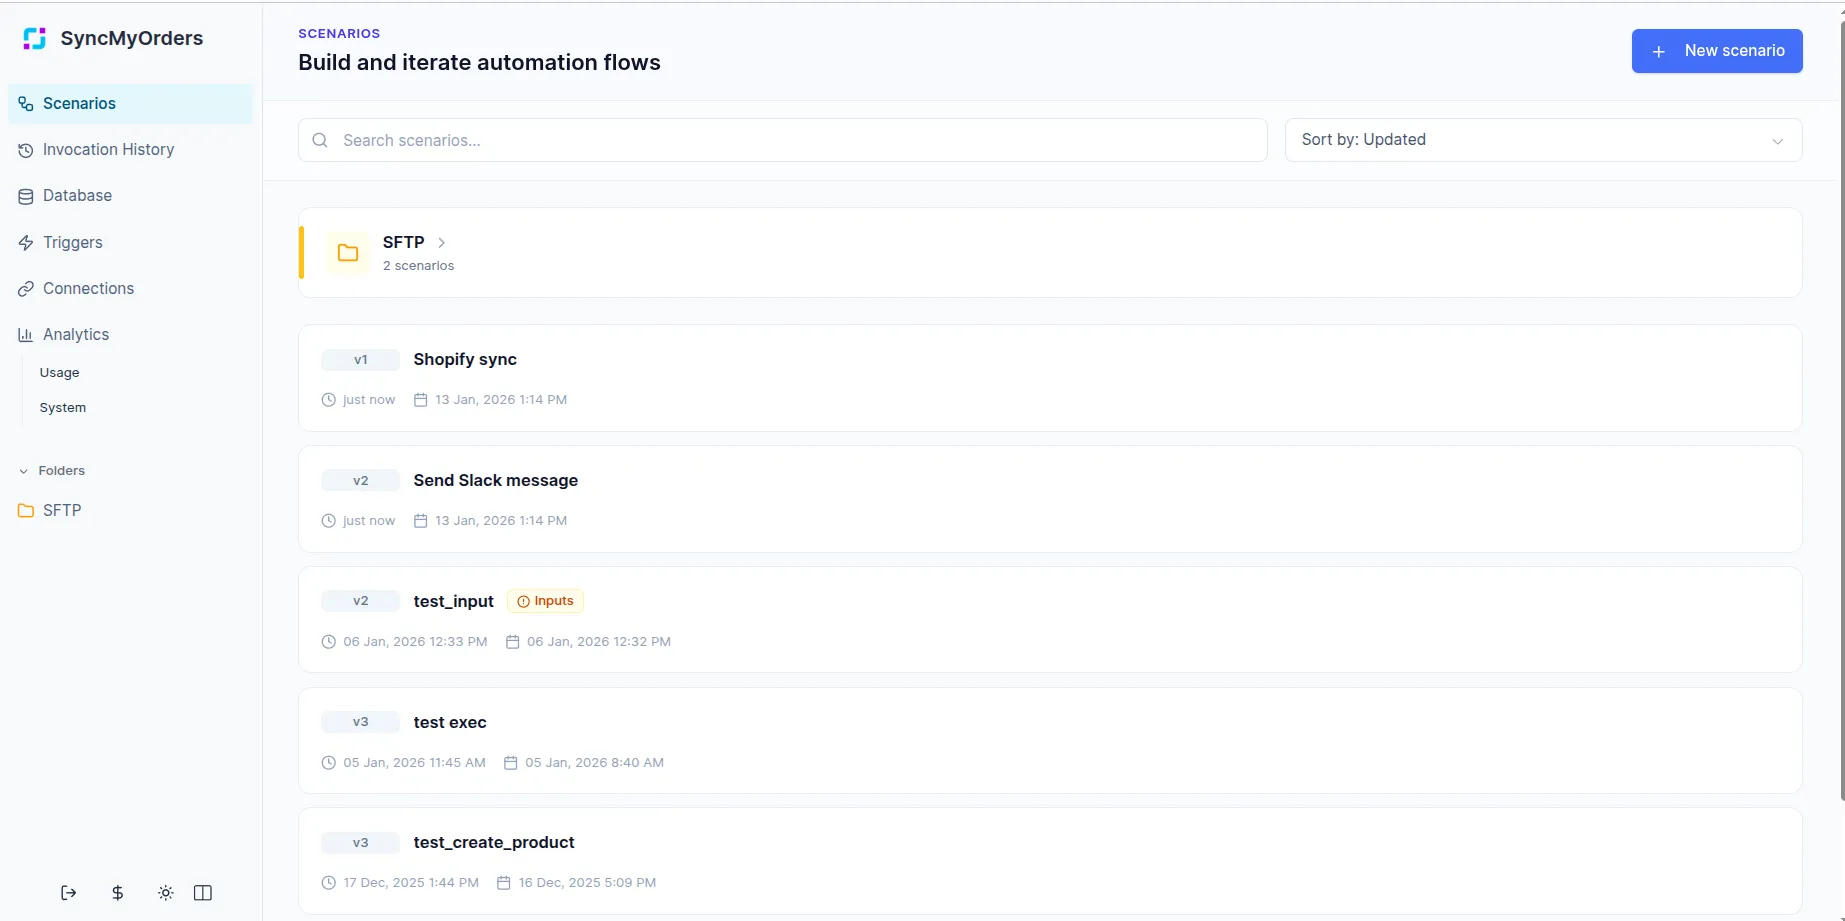
Scenarios page overview
The Scenarios page is your main dashboard for managing all workflows in your workspace. It provides a searchable, sortable list with key details for every scenario so you can quickly find, review, and manage them.
Search and filters. Use the search bar to find scenarios by name or keywords.
Sorting. Sort scenarios by name or last updated date to surface what matters most right now.
Scenario cards and brief details:
- Each scenario entry shows its name, date of last editing and date of last run.
- Scenarios that define any Inputs highlight that in their brief details, so you can see at a glance which flows expect structured data.
- Run an active scenario version from the main page when not using any trigger.
- Use the duplicate action to copy an existing scenario into a new draft, keeping all steps, mappings, and settings as a starting point. Duplicated scenarios are independent from the original, so you can safely experiment, adapt them to a new customer, or create variants without changing the source.
Folders and organization:
- Group related scenarios into folders to keep your workspace organized.
- Moving a scenario into a folder only changes how it’s organized on the Scenarios page — it does not affect its logic, triggers, or versions.
- Use folders together with search and sorting to quickly navigate even very large libraries of workflows.
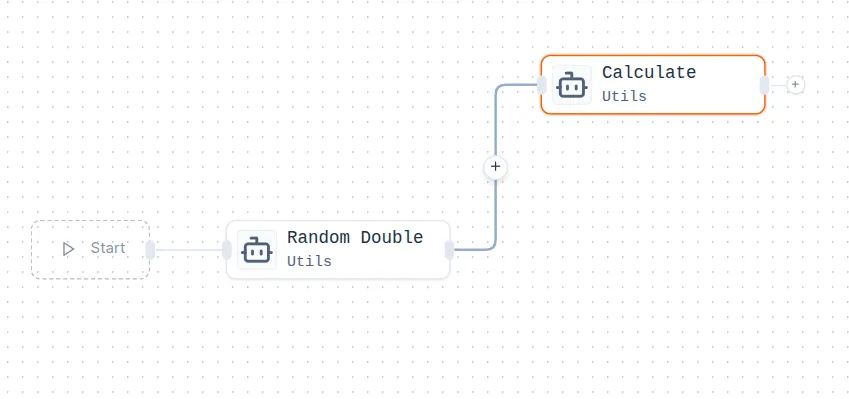
Adding and removing steps
You can add steps to your scenario by clicking the plus (+) icon between or after existing steps in the workflow editor. To remove a step, use the Delete action in its configuration pop-up or press the Backspace/Delete key while the step is selected.
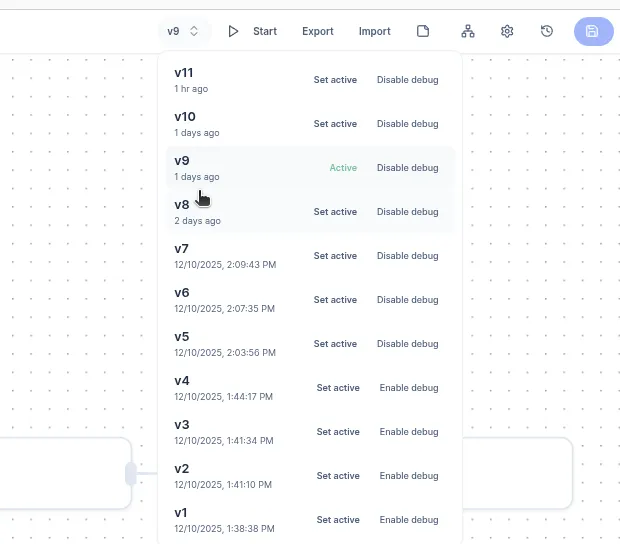
Version management
Version management helps you experiment safely, audit changes, and recover quickly from mistakes. You can iterate on scenarios confidently, knowing that earlier working versions are always preserved.
You can see all scenario versions in the version panel, see when each version was created, and quickly set a specific version as Active. Only one version can be active at a time. Previous versions remain available for reference, debugging, or rollback if needed.
Working with versions:
-
Active.
The active version is the one currently executed when the scenario runs. -
Set active.
Any previous version can be promoted to active with a single click, without re-editing the scenario. -
Debug mode.
Debug can be enabled per version, making it easier to test changes without affecting stable executions.
Scenario settings — such as the Scenario Name, Variables, and Input/Output mapping — are stored within a specific version. This allows users to import or export an exact version of a scenario along with all its associated configuration.
Export/Import scenario
Scenarios can be exported as JSON files that fully represent the workflow structure, step configuration, and mappings. This is useful for version control, reusing them in other accounts, or duplicating complex workflows.
To import a scenario, upload a JSON file without manually recreating the workflow. The platform validates the JSON file before creation.
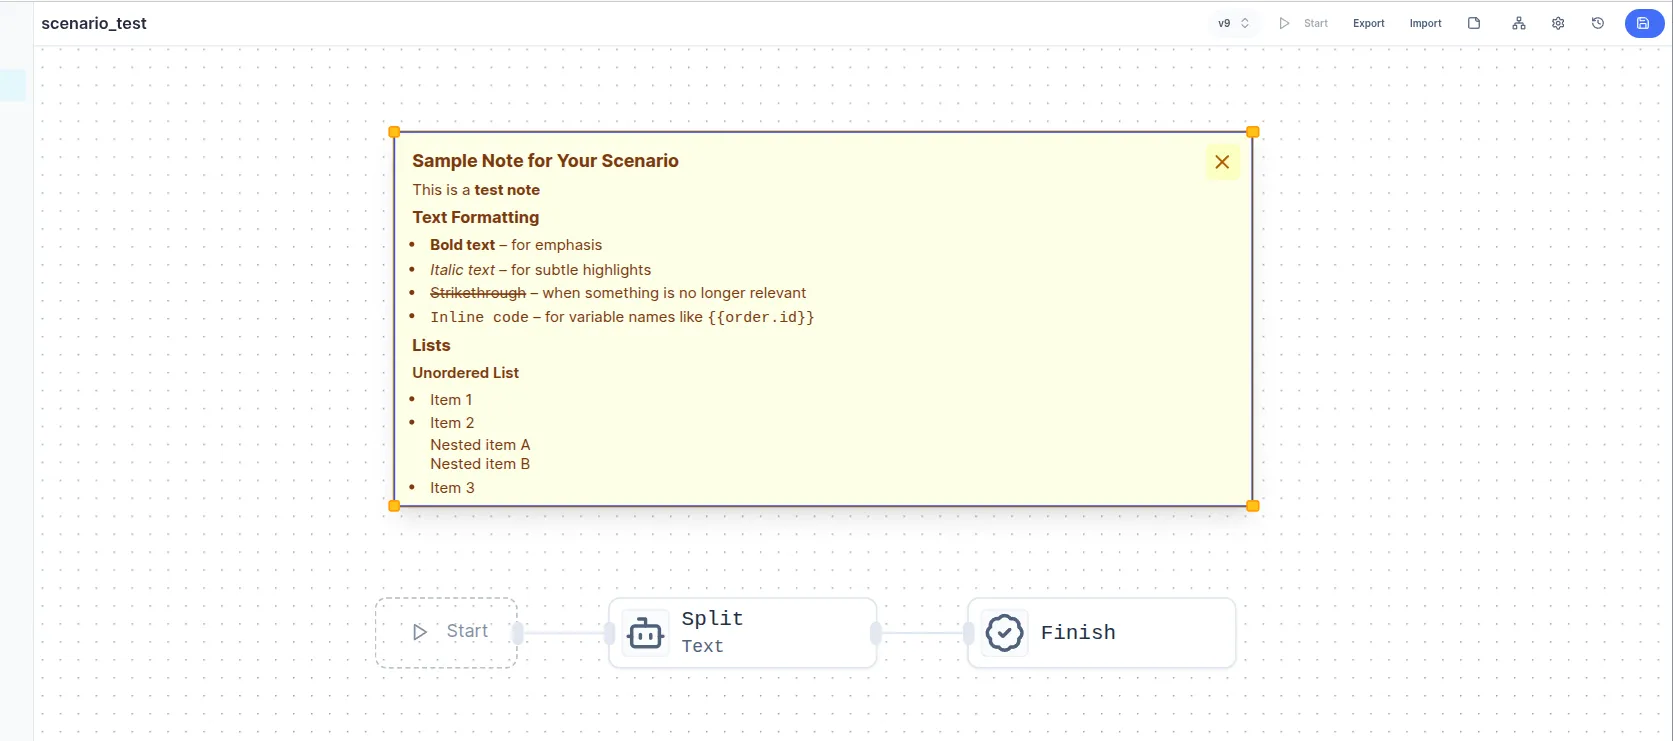
Scenario notes
Use notes to explain why a scenario or specific branch exists, not just what it does. This makes complex flows easier to onboard, review, and maintain over time. Add notes to the canvas or attach them near key steps (such as entry points, critical decisions, or external integrations).
Markdown support: Notes accept Markdown, so you can use headings, bullet lists, links, and inline code formatting.
Auto-layout
Keep your scenario organized automatically by clicking the Auto-Layout button in the top toolbar or a ‘Fit view’ button on the bottom left corner on the workflow editor. This option is ideal for complex scenarios with many branches.
When to use:
- After adding or moving many steps.
- When branches start overlapping or lines are hard to follow.
What it does:
- Aligns steps into consistent columns and rows.
- Spreads out branches so connections are easier to trace.
- Preserves logical ordering while improving spacing.
You can still manually adjust individual steps after running auto-layout if you need a custom visual arrangement.
Moving steps and their descendants
Rearrange steps easily without breaking connections. Connections and execution order remain intact, only the visual positions change.
Hold Alt and drag a step. All connected descendant steps and every downstream node connected to it are moved together.
Use cases:
- Refactor a branch into a new part of the canvas.
- Make space for new logic between existing steps.
- Group related branches visually without reconnecting lines.
Scenario Variables
Scenario variables let you store and reuse values across multiple steps without recomputing them or repeatedly parsing the same payload fields. Also they reduces the risk of inconsistent logic spread across steps.

How they work:
- Define variables in Scenario Settings → Variables tab (these are available throughout the entire scenario, regardless of execution path)
- Reference them later in your workflow.
- Especially useful for API keys fixed configuration values (e.g., warehouse IDs, tax rates, currency), test messages or environment flags.
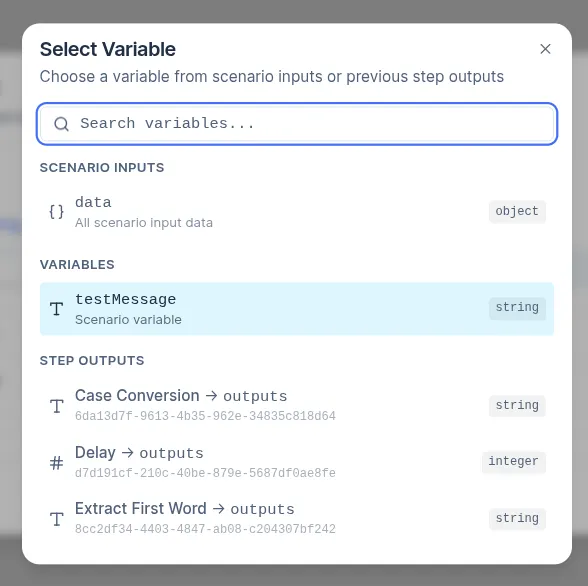
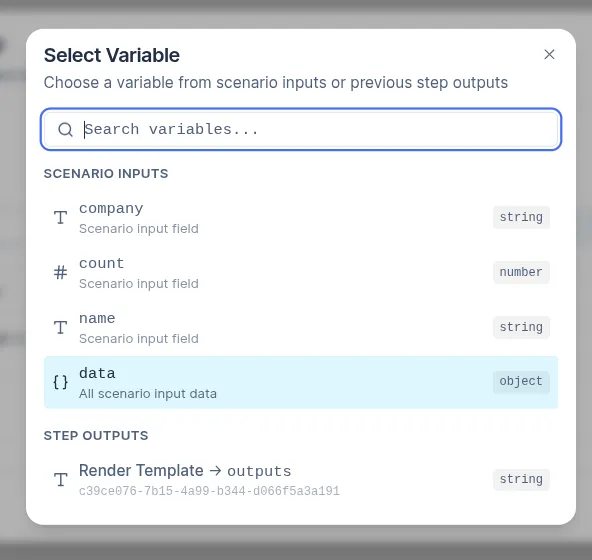
You can define variables directly within individual steps. These variables are created dynamically during execution. When configuring most steps, you can reference variables by clicking the variable picker and selecting from:
- Scenario constants (from Settings).
- Outputs of any previous steps in the flow.
Runtime variables set in earlier steps become immediately available for selection in subsequent steps, making it easy to pass and reuse data without redundant parsing.
Scenario Inputs/Outputs Mapping
Scenario Input and Output mapping defines the contract between your scenario and external systems — specifying what data the scenario expects and what it returns in response. This mechanism allows one scenario to be called by another scenario or triggered externally via API or webhook.
To configure Inputs and Outputs, go to Scenario Settings. Scenarios that contain required fields in their input mapping display additional information in the brief details section on the Scenarios page.
Inputs
Inputs allow you to pass dynamic data into a scenario at runtime (e.g., an order ID, customer details, or a full JSON payload). This enables the scenario to process variable data without hardcoding values.
With Inputs, you can:
- Declare required and optional fields the scenario expects.
- Validate and normalize incoming payloads at the entry step.
- Map raw data to step inputs within the scenario.
How to use Inputs:
- Go to Scenario Settings → Input tab.
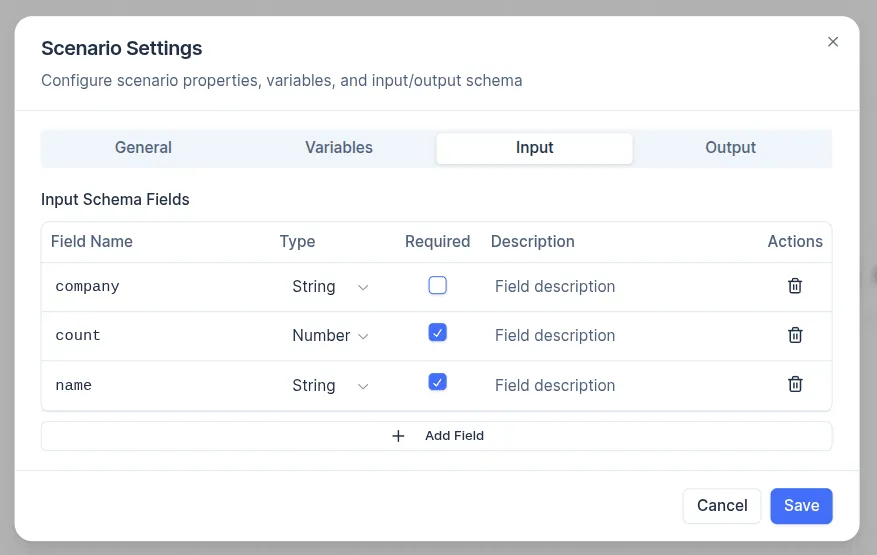
- Add fields to define the expected schema:
- Field Name: A unique name (e.g.,
company,count,name). - Type: Select the data type (String, Number, Boolean, Object, Array, etc.).
- Required: Enable this option if the field must be provided.
- Description: Add a note for clarity (e.g., “Company name for greeting”).
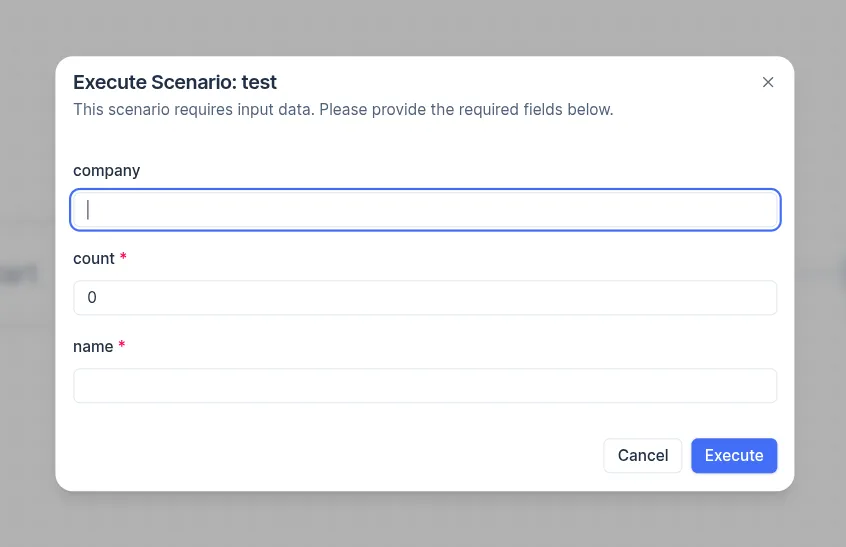
- When launching the scenario, a form will appear where you can enter input values. This makes it easy to test the scenario with custom data.
- For automated triggers (e.g., Webhook), send a JSON payload matching the schema.
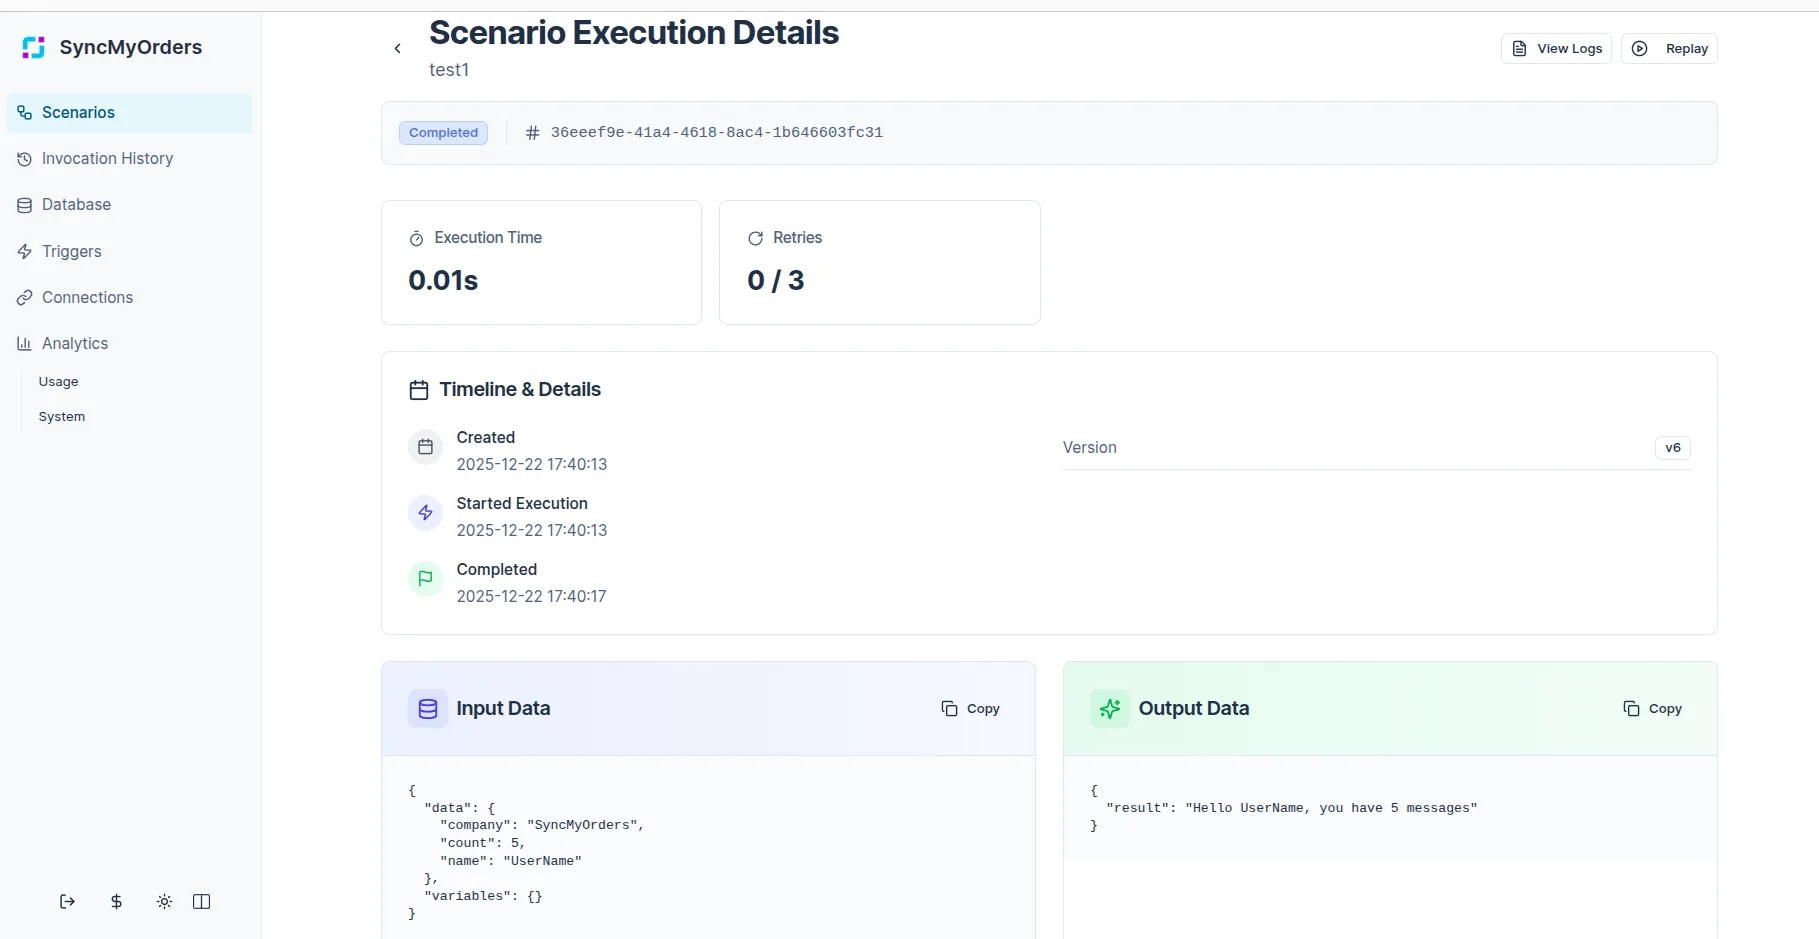
- These input values are recorded and displayed in the Invocation History for each run, under Input Data (as JSON), so you can review what was passed during past executions.
When configuring any step, you can reference Scenario Inputs either as the entire input object or as individual input fields. Use the full input object when you need to pass all input data forward (e.g., to another scenario or an API), or when the payload is complex and you plan to extract specific fields later.
Outputs
Outputs allows you to define what structured data the scenario returns after execution.
- Shape the final response payload returned to the caller.
- Select which variables and step results should be exposed.
- Ensure consistent formats for downstream systems that depend on the scenario.
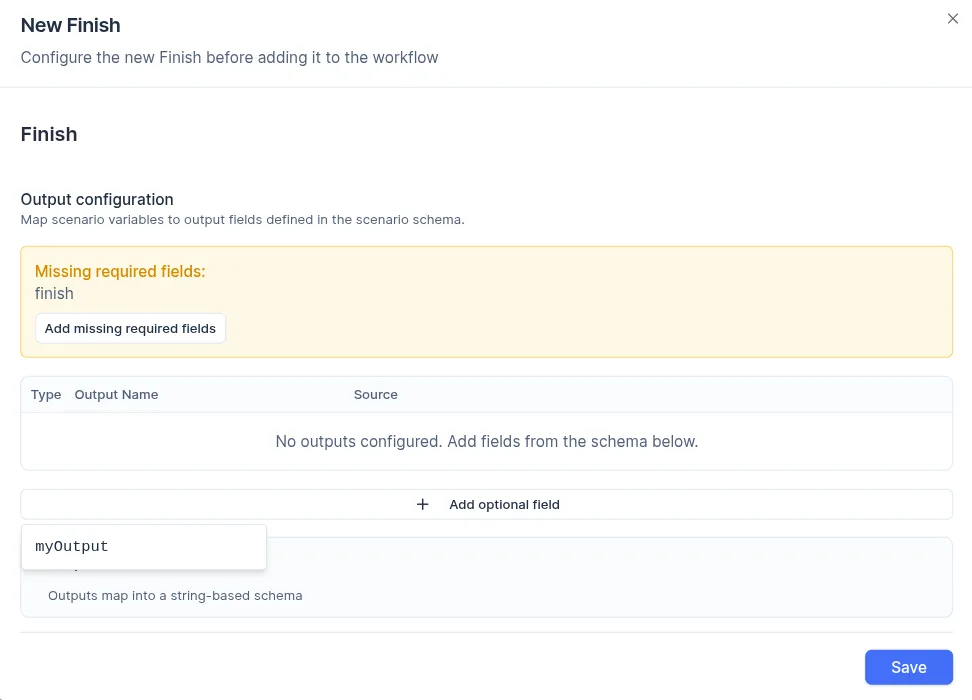
Outputs are configured in the Scenario settings - Output tab. Here you declare the output schema - what fields will be returned, their types, whether required, and descriptions.
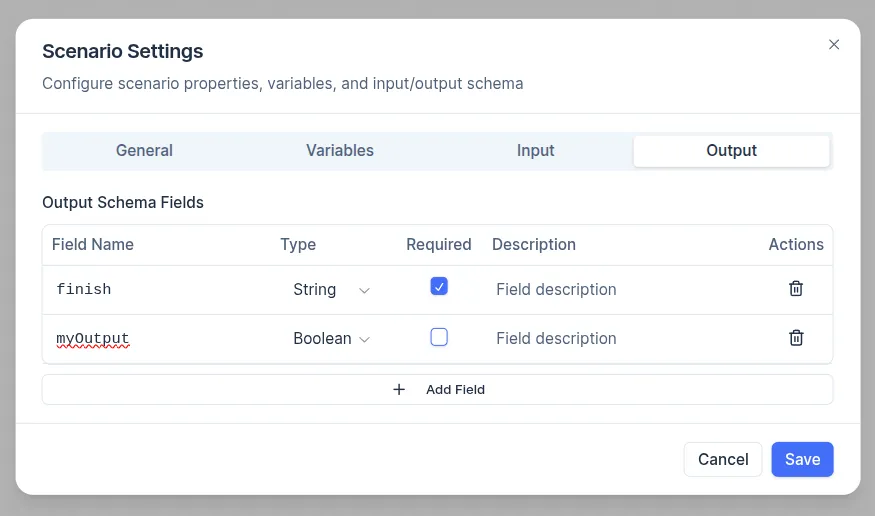
In the Finish step of the scenario, you will see all output fields defined in your schema listed and ready to be populated with actual values. A warning message is displayed if any required fields are missing, while optional fields are available from the drop-down under the Add optional fields button.
Outputs appear in Scenario Execution Details → Output Data as clean JSON, making it easy to review results of past runs.
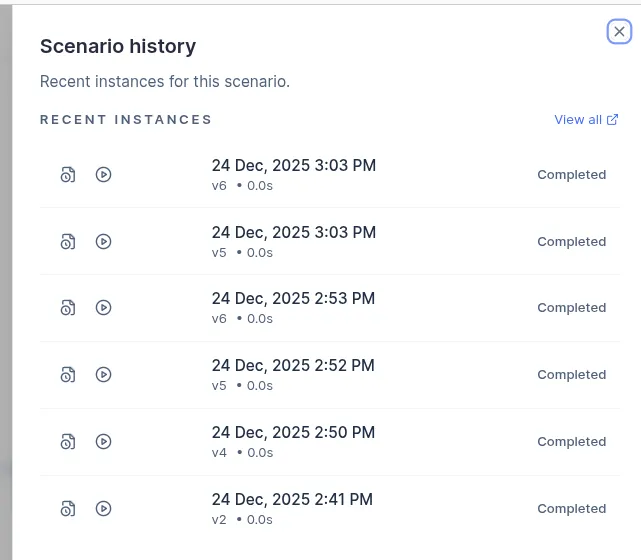
Scenario history
Scenario history is a complete log of every time your scenario has run (also called “invocations” or “instances”). It’s your go-to place for monitoring, debugging, auditing, and understanding real-world behavior of your automations.
You can click the History icon in the top toolbar of the scenario editor to open a popup that displays the most recent scenario runs directly in the editor. Each entry includes the execution timestamp, the scenario version that was run (e.g., v6, v5,…), duration and status (Completed, Failed, etc.).
From this popup, you can navigate to the list of all executions of the current scenario by clicking View all, or open the execution details for a specific run. The Replay option is also available, allowing you to rerun the scenario with the same input data.
Debug mode
Debug mode helps you understand exactly how a scenario is executed by exposing step-by-step details for each run.
- Per-version setting: Debug mode can be enabled for a specific scenario version (e.g., a draft or new version) without affecting stable, active versions.
- What it shows:
- The full execution path taken through the scenario.
- Inputs and outputs of individual steps, including mapped fields and variable values.
- Errors and branch decisions, so you can see why a particular path was chosen.
- Typical usage: Turn on debug for a draft or new version, trigger test invocations, review the traces, then disable debug when you promote it to Active.
Use debug mode together with invocation history to move from a failing run to a detailed trace of each step, making it much faster to diagnose and fix issues.